Full Context Menus in Windows 11 – The user interface in Windows 11 was significantly changed. Aside from the new macOS-inspired taskbar, there is a new Settings app and Start menu.
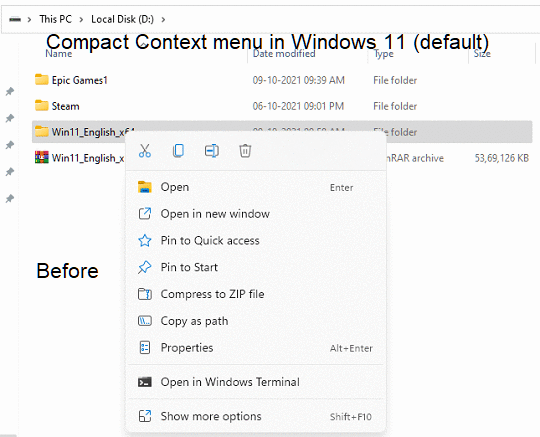
Another visible change in the new OS is the compactness of the context menus. When compared to previous versions of Windows, the context menu or the Right Click menu in Windows 11 has been revamped and has fewer entries.
Windows context menus now include a row of icons for basic actions such as copy, paste, and delete.
It may appear appealing at first glance,
but the problem is that it conceals some functionality you may require behind a “Show More Options” button.
For example, if you need to zip or archive a file, you will not see your beloved 7zip or WinRar in the menu unless you click the ‘Show More Options button and select the archiving software.
Consider how inconvenient it will be if you have to do this every time you want to see all of the context menu options.
If you are unhappy with this change, you can revert to Windows 11’s default full context menus.
You can enable the classic full context menus in Windows 11 by utilizing one of the two techniques listed below.
How to Enable or Disable Full Context Menus in Windows 11?
Method 1: Using the Registry Editor.

Enable the Full Context Menu:
- Launch the Run app by pressing Win + R.
- Paste the following into the Run dialog box.
reg.exe add "HKCU\Software\Classes\CLSID\{86ca1aa0-34aa-4e8b-a509-50c905bae2a2}\InprocServer32" /f /ve
- Press the Enter key.
- Restart Windows Explorer – Press Ctrl+Shift+ESC to access Task Manager, then find Windows Explorer in the process tab, right-click it, and select the restart option.
That’s all; you’ve enabled the complete context menu.
Note: You can also do the same thing via Windows Terminal, copy and paste the above code in the windows terminal, hit the enter button.

Disable the Full Context Menu:
- Start the Run app(Win+R).
- Paste the following into the Run dialog box.
reg.exe delete "HKCU\Software\Classes\CLSID\{86ca1aa0-34aa-4e8b-a509-50c905bae2a2}" /f
- Press the Enter key.
- Restart Windows Explorer – Press Ctrl+Shift+ESC to access Task Manager, then find Windows Explorer in the process tab, right-click it, and select the restart option.
Note: You can also do the same thing via Windows Terminal, copy and paste the above code in the windows terminal, hit the enter button.

Method 2: Using Free software called Win11 Classic Context Menu v1.0
This portable free application provides an easy-to-use strategy for disabling or enabling the complete context menu in Windows 11 if you are uncomfortable with the Registry edit method.
Simply download the free app from here( zip file).
Extract the Zip file, run the app.
To enable the full Context Menu, click the very first button and then hit the Restart Explorer button.
Use the second button (Enable Win 11 default Context Menu Style) to revert to Windows 11’s default compact Context menu.